I through out the idea if people wanted me to photograph my miniatures on a white background or on a themed scene and the response was a themed scene. My problem is that while I have the stuff for Gremlins, for most others I don't have. I hope in the future to get print outs to use underneath or small boards that connect, but for now I just have to work on ones for current projects. The recent one was the nightmare box set called 'The Wild Ones', a Lucas McCabe alternate box set. Since I wanted a Guild themed crew, I worked on creating the right crew with a sort of wasteland feel.
Note: This article is simply to give you an idea on how to create a simple board for photographing miniatures on. You don't have to do it like this and is just meant to show that such things can be done easily and hopefully you'll be inspired to make your own. This project was a rush job, so there were various problems here and there. I would suggest taking your time in making your own as you can better pick up faults during the various processes and fix them up before you reach the later stages, which can be extremely difficult to fix up.
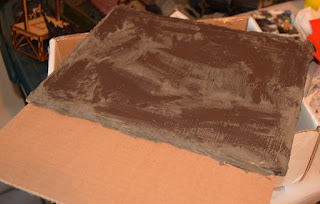
As it just so happened, the box that my GenCon order arrived had a cardboard top that suited my plans perfectly. I decided to make the scenic board based on their scenic bases, so that meant making the base on a larger scale. First step was to use a lot of wood filler mixed with black paint. The result darkens it, but it's more a muddy sort of grey-brown colour.
After leaving it overnight to dry, I sanded and glued on a few rocks. I then began layering brown paint followed by a wash or two of black wash. Once dried, I began dabbing various amounts of Agrellan Earth from the GW range. After a few hours, I returned to add an extra amount here and there where it wasn't working.
After leaving it overnight (again), I began layering various layers of paint. These included Zamesi Desert, Karak Stone and Bleached Bone with a very light dry brushing of Terminatus Stone here and there. The rocks were based with Bleached Bone, followed by a brown wash, a Karak Stone drybrush and finally a Terminatus Stone dry brush. A mix of brown and black wash was added into the various cracks that didn't stand out as much, a Gryphonne Sepia was placed in a spot or two along with a mixture of brown and flesh wash to add colour to some spots.
Finally, dried grass clumps were added to finish it off.
I only had a few problems making this and it's very obvious as to where they occurred. The cardboard was slightly bent when I did the layer of wood filler and after it dried I noticed it. I tried to fix it, but it cracked the middle. Worse was the fact that I rushed the layering of the wood filler and you can see it in the overall look. It doesn't matter too much to me personally as it was really only going to be used for a one off set of shots (I doubt I'll do much more guild then this), but for those who want something more permanently, I do suggest taking your time to shape it. Overall, it works for what I wanted it for and the results are acceptable.


No comments:
Post a Comment